How to Import PST to Exchange Server: A Complete Guide for 2025!
A Personal Storage Table (PST) file is mainly used for storing data including emails, contacts, calendars, and other data. However, due to many reasons, users want to import PST to Exchange Server. The main drivers for this migration include centralized location, managing data effortlessly, accessing data from any location, and avoiding the corruption in data.
Unfortunately, most users don’t how to migrate PST to Exchange. That’s why through this post, we will explain to users the tried and tested solutions, the best practices, the challenges in this migration, and how to fix them. Are you excited for this informative journey? If yes, then let’s start this discussion with a quick overview of PST.
What is a PST File?
A PST file (Personal Storage Table) is used by Microsoft Outlook for storing users’ data locally. These files act as a backup since they save all the items included in Outlook whether emails, calendars, contacts, or other mailbox data in our systems. PST plays a vital role in running Outlook smoothly if it corrupts or is damaged MS Outlook will crash, and you may be unable to access your data.
Additionally, these files are sensitive and can be corrupted easily, so that’s why the need to migrate PST to Exchange Server becomes essential. Not only this but there are several reasons behind the same, which are listed in the next section.
Why to Import PST to Exchange Server?
When we talk about PST to Exchange Server migration, then the first question that comes to every user’s mind is what is the benefit of importing PST to Exchange. So, in this section, we answer the same query:
- Migrating offline data to Exchange offers a centralized location for all the data.
- Available data in On-Premise Exchange can be accessed from anywhere.
- By moving data to this service, one can gain the benefit of team collaboration using shared mailboxes.
- The Exchange Server will add another layer of security by giving robust backup and recovery features.
- Storing large data in a system poses hardware failure, slow performance, and other issues. But when import PST to Exchange Server, you free up space on your PC and benefit from the Exchange’s large storage.
- Managing the primary mailbox is easy with Exchange’ archiving feature, and moving offline data into it ensures a clean and only necessary data.
- Transferring Outlook files to Exchange helps users reduce the need for manually repairing PST files.
- Unlike PST files, the Exchange’s searching feature makes it easy for users to find desired data in minimum time.
How to Migrate PST to Exchange Server: Methods and Steps!
Importing PST to Exchange Server is the most simple and crucial task for technical users. To do so, our experts researched and discussed with MVPs, and found four solutions reliable and safe for this migration. Additionally, opting for a safe and secure technique is the key to a hassle-free transition. The following solutions are tested and 100% safe to import PST to mailbox Exchange 2016, and other versions. Without any further ado, let’s have a look at their details and instructions:
Solution 1). Import PST to Exchange Server Via Exchange Admin Center (EAC)
The EAC is used by Admins to configure and manage the Exchange Server. Moreover, this service is also used to migrate PST to Exchange Server by following these steps:
- Log in to the Exchange Admin Center (EAC) with Admin credentials.
- Hit the Recipients > Migration > Add > Import PST.
- Now, when Import Wizard prompts, provide the UNC path and name of the PST file.
- Select the mailbox as a destination for importing i.e. import to this mailbox or mailbox’s archive. Hit Next.
- Lastly, select Add or Remove users, and press the Finish button to proceed.
So, this solution is straightforward and best for those who seeking a free manual method. Let’s move to the next solutions and then select which suits you best.
Solution 2). Using PowerShell to Import PST to Exchange Server
Technical users, who need an efficient and automated solution can opt for PowerShell. For the same, the instructions are as follows:
- Open Windows PowerShell as an administrator and run this command:
New-MailboxImportRequest -Mailbox <UserMailbox> -FilePath <PSTFilePath> - Check the Import Request:
Get-MailboxImportRequest - Confirm the migration:
Remove-MailboxImportRequest -Mailbox “user”
This solution is complicated and requires a high level of technical expertise, so it is recommended don’t opt for this if you are a naive user. Since there is a risk of data loss with this, so be careful if considering it.
Solution 3). Use Outlook to Migrate PST to Exchange Server
This method can be used by individuals, as this solution helps to migrate small data to Exchange. For the same, the steps are as follows:
- Within Outlook > File > Open & Export > Import/Export.
- Choose Import from another program or file and click Next.
- Select Microsoft Outlook Data File (.pst) and browse to the location of the PST file.
- Choose the Exchange mailbox as the destination.
That’s it! You have to repeat the entire procedure for each file, that’s why this solution is not suited for large volumes of data.
Solution 4). Leverage a Cutting-Edge Solution to Import PST to Exchange Server
We researched this query and found that all manual solutions are complicated and time-consuming. That’s why our technical team created a smart solution i.e. PST to Exchange Server Importer. This utility we made after researching all the user pain points like slow migration, complex steps, etc.
The very first thing is, that it can be used by any user whether technical or non-technical, thanks to its self-explanatory interface. Additionally, one can try our tool for free to migrate PST to Exchange, before any commitment.
After downloading this, you get the various benefits which are:
- Bulk Import: With this feature, one can effectively migrate large volumes of data in a minimum time.
- Compatibility: This software runs on every Windows device and supports all the Exchange Server versions for import.
- Maintains folder hierarchy: Unlike manual methods, it preserves the data hierarchy throughout the procedure.
- Desired data migration: Various filters are offered by this including Date Filter, Delta migration, re-run migration, and more.
- Real-time progress: One can monitor the entire migration through this real-time progress tracker.
How to Use this Utility to Migrate PST to Exchange Server?
Now, go through these instructions to import PST to Exchange Server:
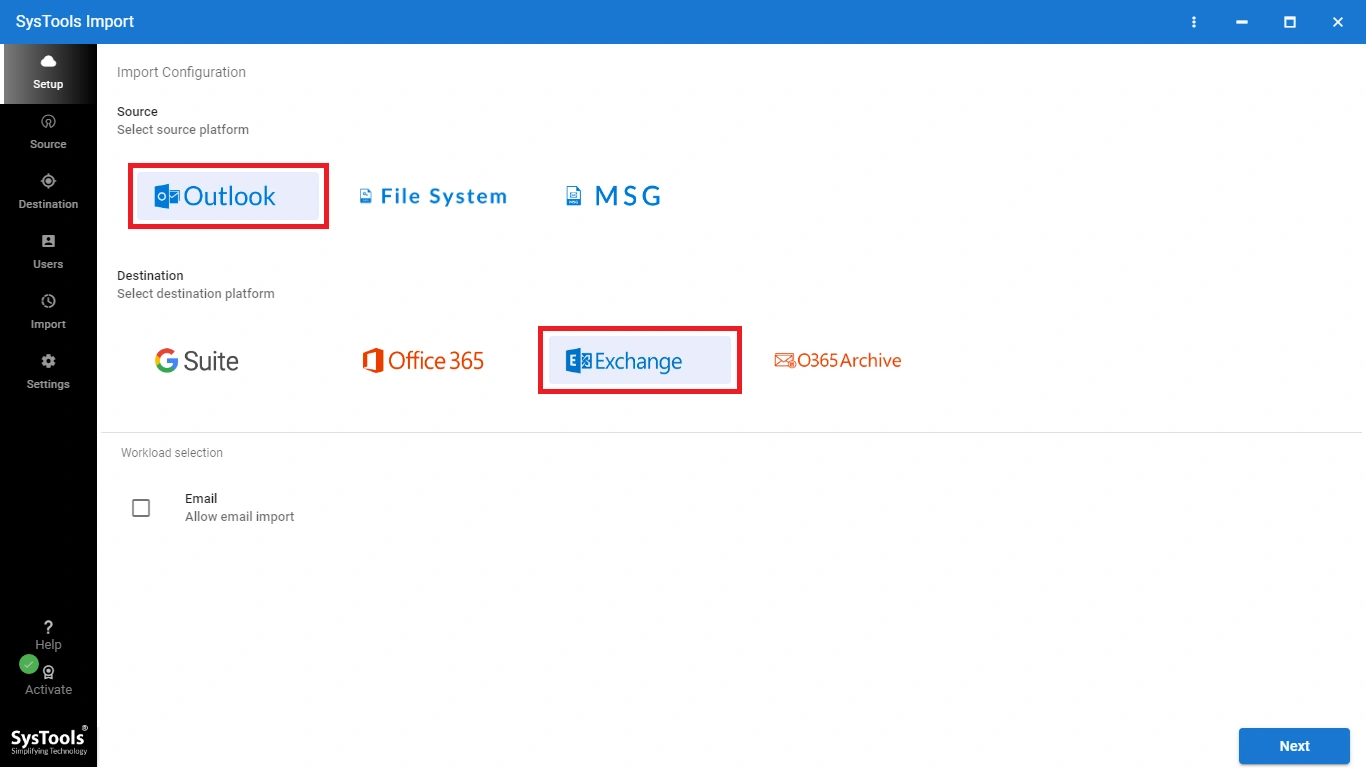
Step 1: Run the software, and choose Outlook as the source and Exchange as the destination.
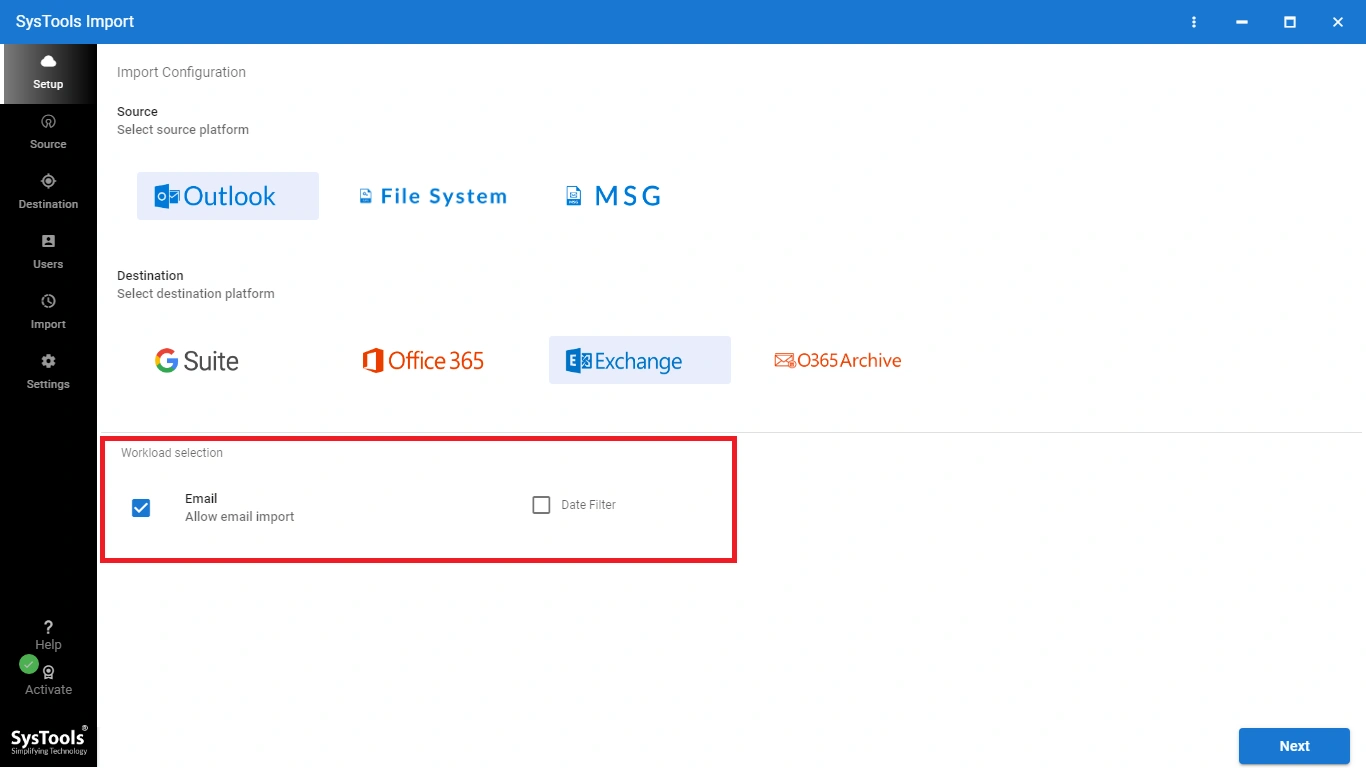
Step 2: Select Email under Workload Selection and apply any desired date filters.
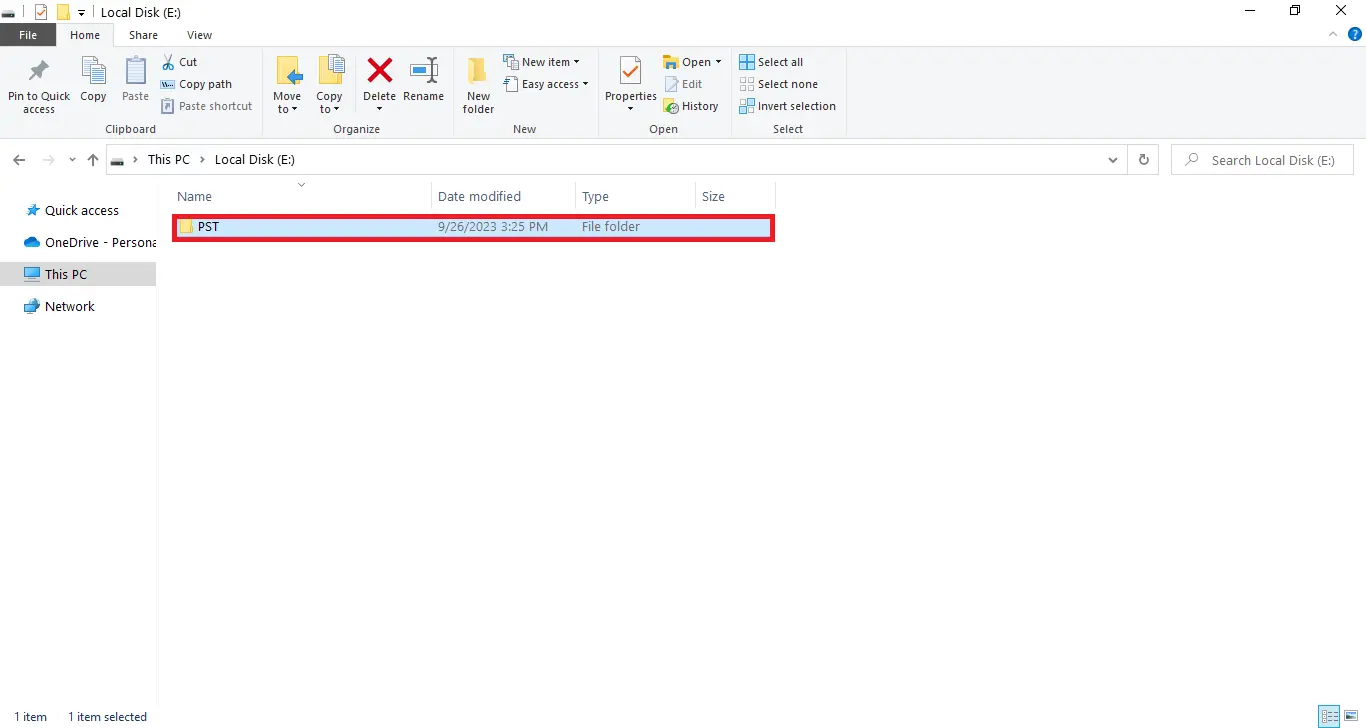
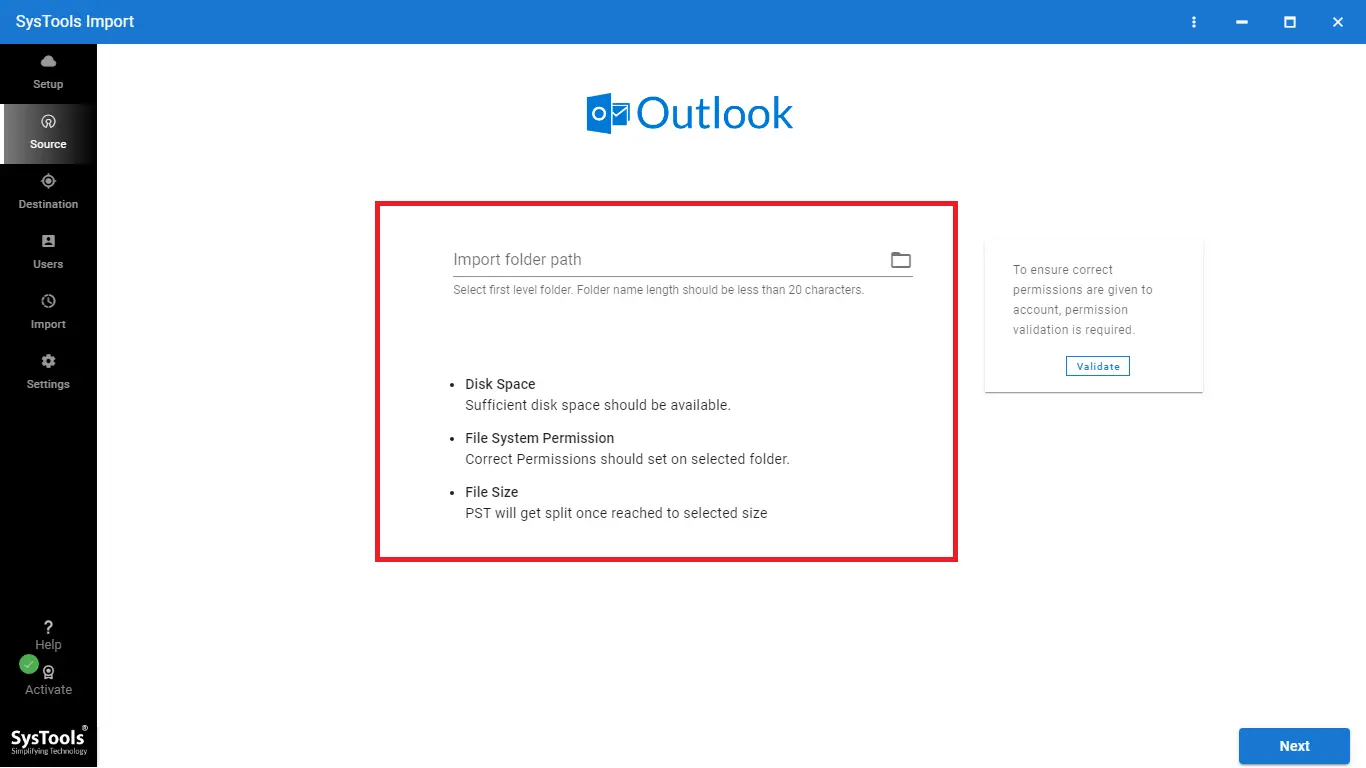
Step 3: Organize your PST files into folders labeled with Exchange user IDs (e.g., create a “pst” folder on your drive).
Step 4: In the Source tab, define the folder path (e.g., E:/PST/) as the Import Folder Path.
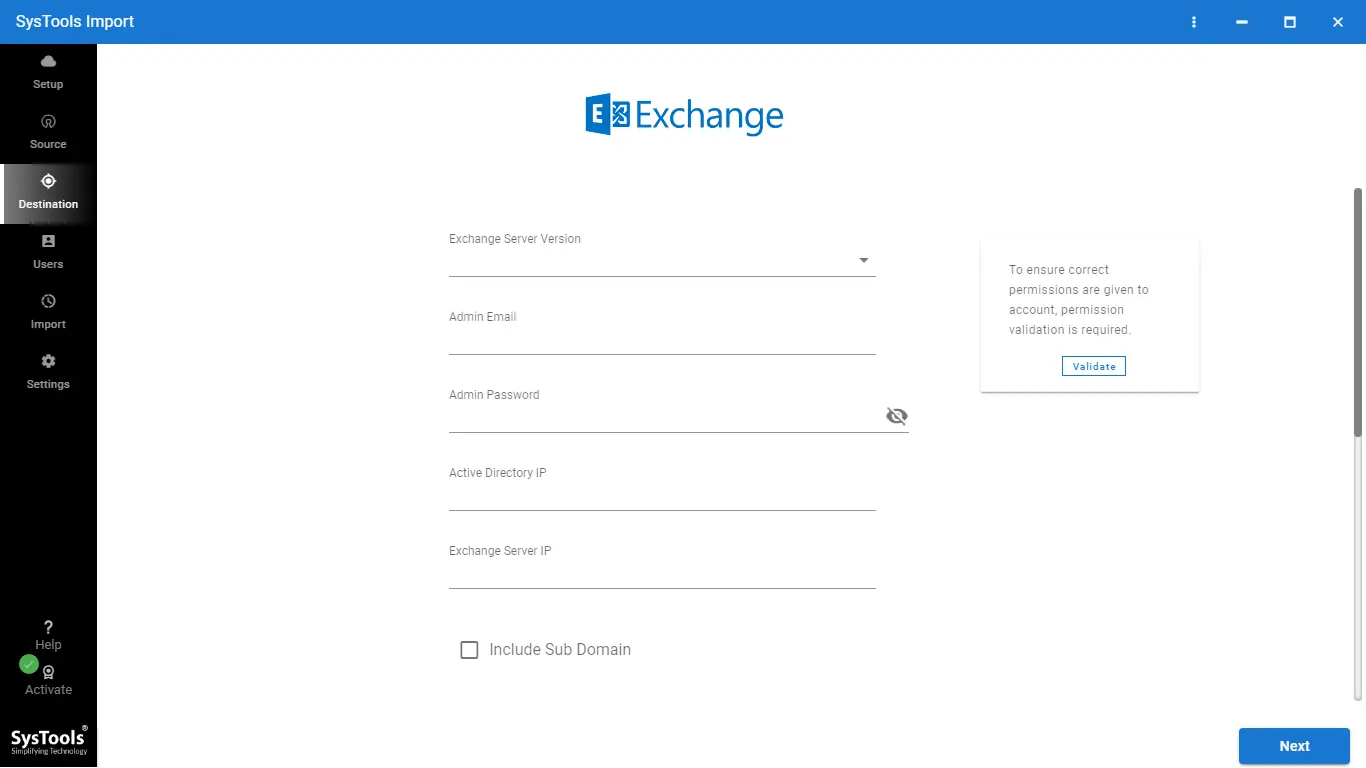
Step 5: Enter the Exchange Admin credentials in the Destination tab.
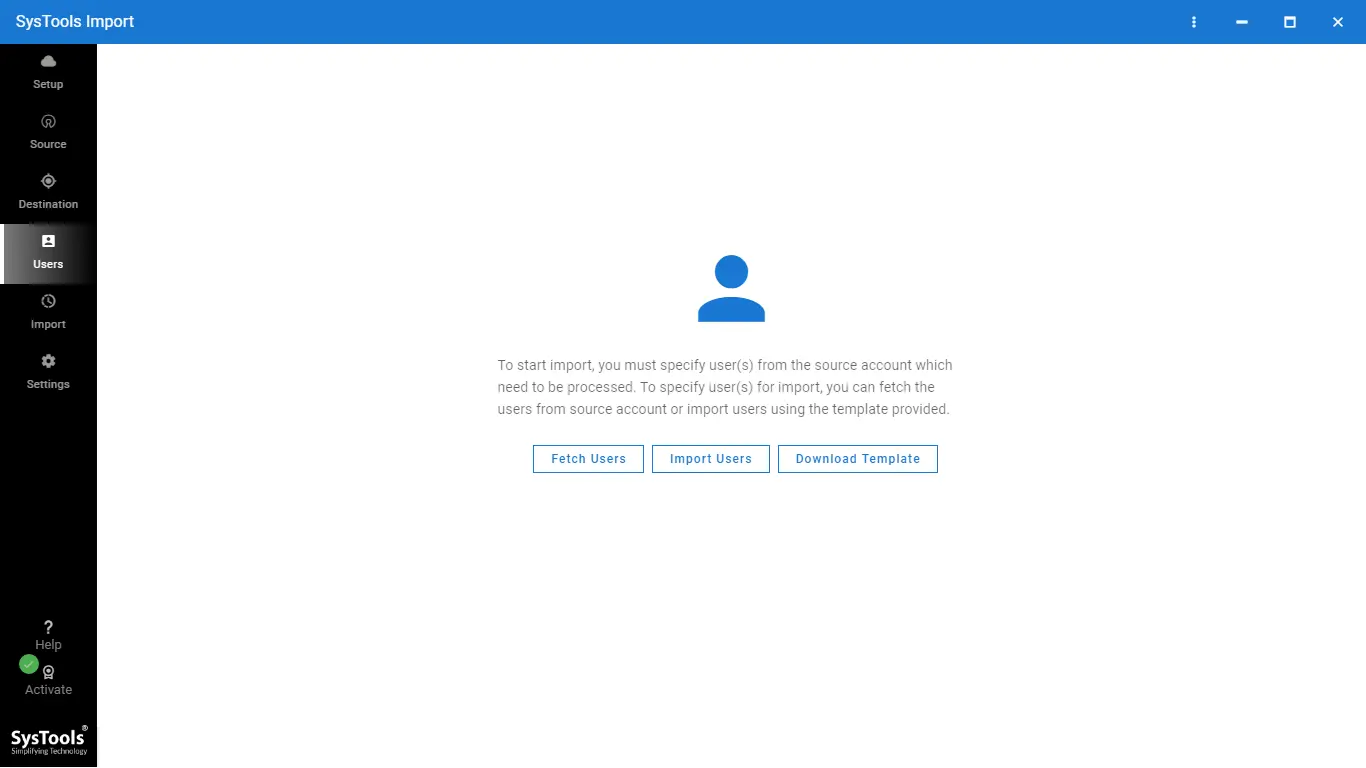
Step 6: Add users to the Users tab using any available method.
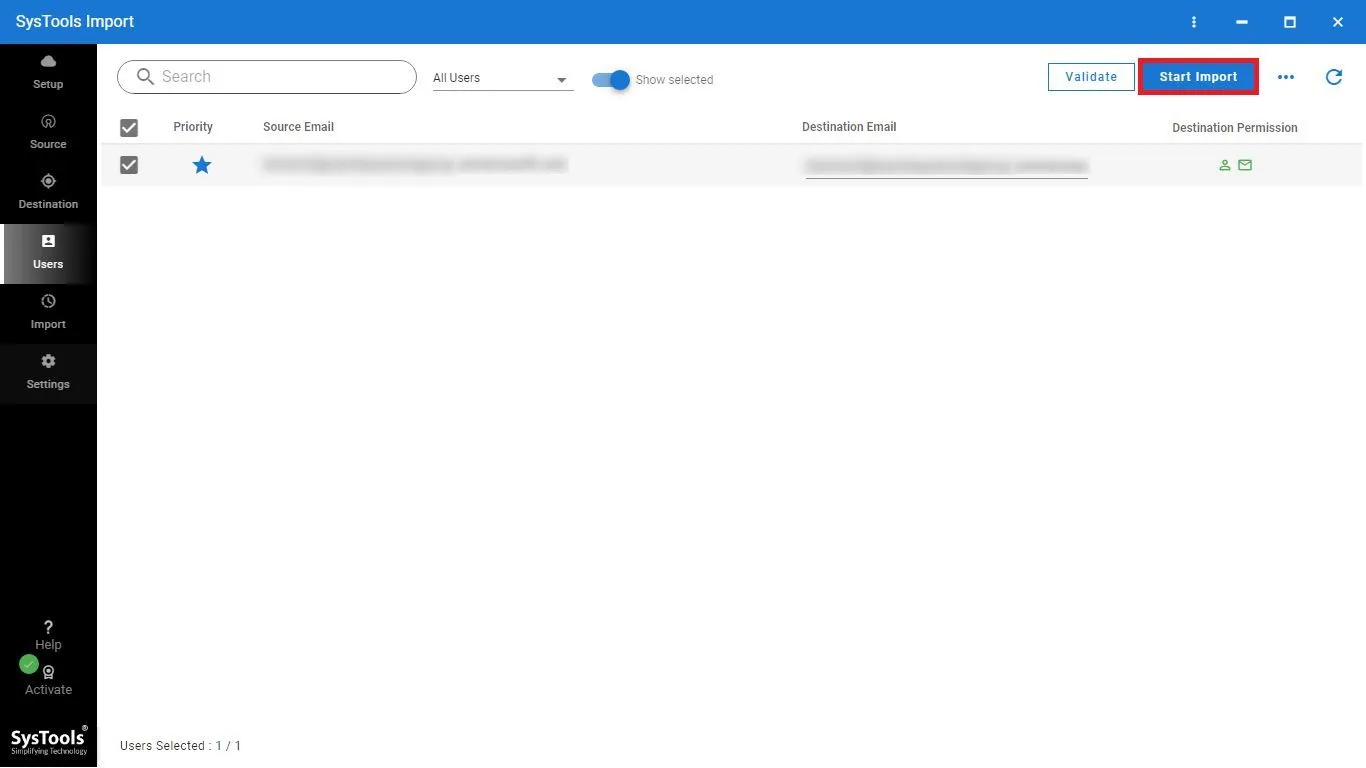
Step 7: Verify the permissions and click “Start Import” to transfer PST files to the Exchange Server.
Bottom Lines!
Importing PST to Exchange Server is an essential step in organizations to ensure a centralized location, better collaboration, and many more. In this guide, we learned the most reliable and secure solutions to import PST to Exchange Server effortlessly. One can choose any of them according to their needs. Still, it is recommended by experts to opt for the mentioned specialized software to migrate PST to Exchange hassle-free.